
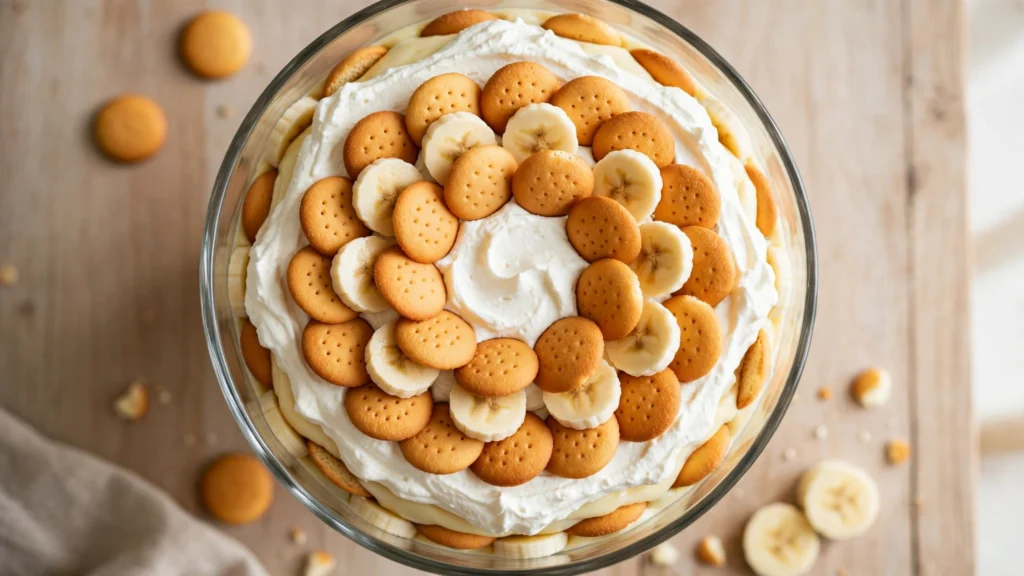

This Southern-style banana pudding is a layered, no-bake dessert built from thick vanilla pudding, ripe banana slices, and crisp vanilla wafers that soften into a soft, cake-like texture as everything chills together. It’s one of those desserts that looks far more impressive than it actually is to make — there’s no oven involved, no complicated technique, and most of the “work” happens in the refrigerator rather than in your hands.
What Makes the Pudding So Thick
The pudding base uses less milk than the instant pudding box normally calls for. On its own, that would make the pudding too thick to eat with a spoon — but that’s exactly the point here. Sweetened condensed milk is whisked in afterward to soften the very thick pudding base back down to something spoonable, while also adding sweetness, milk solids, and extra richness (it’s a concentrated, sugar-heavy ingredient, not a plain thin liquid, so it adds body as much as it thins things out). Whipped cream is then folded in at the end to lighten the mixture further. The result is a pudding that’s thick enough to hold its shape when layered but still soft and airy once you take a bite — not a dense, gluey block, and not a runny pudding either.
Flavor and Texture
Every layer contributes something different: the pudding is smooth and lightly sweet with a strong vanilla background, the bananas add natural sweetness and a slightly firm bite, and the wafers — once softened by a few hours in the fridge — take on a texture closer to cake or soft cookie than a crunchy biscuit. The whipped cream topping stays a little lighter and less sweet than the pudding underneath, so the dessert doesn’t feel one-note.
Why It’s Beginner-Friendly
There’s nothing technical here beyond whisking a pudding mixture and whipping cream to stiff peaks, both of which are explained step-by-step below with visual cues so you know exactly what “done” looks like. Because everything is assembled cold and finished in the fridge, there’s no risk of overcooking or undercooking anything — the biggest factor in how it turns out is simply giving it enough time to chill.
Make-Ahead and Serving
This dessert needs a minimum chilling time for the wafers to soften properly, which makes it a genuinely useful make-ahead option — you can build it the night before and it will actually taste better for having sat longer. It’s traditionally scooped straight from a large trifle bowl or casserole dish with a big spoon, so each serving naturally includes all the layers. It’s a common choice for potlucks, barbecues, and family dinners, partly because it travels well chilled and doesn’t need reheating or last-minute attention.
What to Watch For
Banana slices exposed to air will start to brown within an hour or two, so the timing of when you slice them and how well you cover them with pudding both affect how the finished dessert looks (browning mainly affects appearance).
Classic Southern No-Bake Banana Pudding
Description
A creamy, no-bake Southern banana pudding layered with vanilla wafers, fresh banana slices, and lightly sweetened whipped cream. About 20 minutes of hands-on prep, then chilled until the wafers soften into a soft, cake-like layer — a reliable make-ahead dessert for potlucks and family meals.
Ingredients
Instructions
-
Get everything cold first. Put your mixing bowl and beaters in the fridge or freezer for 10 minutes before starting — cold tools help the cream whip faster and hold its shape better later.
-
Make the pudding base. In a large bowl, add the cold milk, alcohol-free vanilla extract, and both boxes of instant pudding mix. Whisk by hand or with a mixer on low speed for about 2 minutes. The mixture will go from watery to noticeably thick — it's ready when it coats the back of a spoon and holds a line if you drag your finger through it.
-
Add the condensed milk. Pour in the sweetened condensed milk and whisk until completely smooth, with no streaks. Taste it — if you prefer a less sweet pudding, you can hold back a few tablespoons of the condensed milk, though this is an optional adjustment: the nutrition values in Section 13 are calculated using the full amount listed, and using less will lower the sugar and calorie figures slightly and may make the pudding a little softer.
-
Whip the cream. In your chilled bowl, beat the cold heavy whipping cream on medium-high speed for 3–4 minutes. Watch for stiff peaks: when you lift the beater out, the cream should stand straight up and hold its shape without drooping. Stop as soon as you reach this point — overbeaten cream turns grainy.
-
Combine the two mixtures. Scoop about two-thirds of the whipped cream into the pudding bowl. Using a rubber spatula, fold it in gently: cut down through the middle, scrape along the bottom, and turn the mixture over on itself. Repeat until no white streaks remain — this should take about 1 minute. Avoid stirring in circles, which knocks the air out of the cream.
-
Prepare the topping. Add the powdered sugar to the remaining one-third of whipped cream and fold to combine. Cover and refrigerate this bowl until you're ready to decorate the top of the dessert.
-
Slice the bananas right before layering, not earlier — bananas start to brown once cut, so slicing them just before you need them keeps the layers looking their best. Cut into rounds about 1 cm (½ inch) thick.
-
Build the first layer. In a trifle bowl, glass dish, or 3-quart casserole dish, spread one-quarter of the vanilla wafers evenly across the bottom (it's fine if they overlap slightly). Add one-quarter of the sliced bananas on top of the wafers.
-
Add pudding over the bananas. Spoon one-quarter of the pudding mixture over the wafers and bananas, spreading it out with the back of a spoon so it fully covers the banana slices — this helps slow browning while the dessert chills.
-
Repeat the layers. Repeat steps 8 and 9 three more times (wafers, bananas, pudding) until you've used everything and have 4 full layers.
-
Finish with the topping. Spread or pipe the reserved sweetened whipped cream over the final pudding layer. If you'd like to decorate with crumbled wafers, add them now. Save any decorative banana slices for just before serving — bananas left uncovered on top would brown during the long chill.
-
Chill. Cover the dish and refrigerate for at least 4 hours. Doneness cue: the dessert is ready when you press a spoon into it and the wafers give easily, with no hard crunch left — they should feel closer to soft cake than a cookie. If you have time, chilling overnight gives an even softer, more evenly set result.
-
Decorate and serve cold. If you're adding banana slices on top, cut them fresh now, right before the dessert goes to the table. Scoop straight down through all the layers with a large spoon so each portion gets pudding, wafers, and bananas together.
Nutrition Facts
Servings 10
- Amount Per Serving
- Calories 604kcal
- % Daily Value *
- Total Fat 28g44%
- Saturated Fat 16g80%
- Sodium 485mg21%
- Total Carbohydrate 80g27%
- Dietary Fiber 2g8%
- Sugars 59g
- Protein 7g15%
* Percent Daily Values are based on a 2,000 calorie diet. Your daily value may be higher or lower depending on your calorie needs.
Note
- Storage: Cover and refrigerate leftovers; enjoy within 2 days for the best texture. The wafers will keep softening the longer it sits, so texture changes slightly day to day.
- Freezing: Not recommended — the whipped cream and pudding separate and turn watery and grainy after thawing.
- Reheating: Not applicable; this dessert is meant to be served cold.
- Why less milk than the pudding box suggests: Using 2 cups of milk with 2 boxes of pudding mix (instead of the 4 cups the boxes would normally call for) makes an intentionally thick pudding base. This is balanced back out with sweetened condensed milk and whipped cream, giving a pudding that's firm enough to hold its shape in layers but still creamy to eat.
- Pro Tips:
- Chill your mixing bowl and beaters before whipping the cream — it whips faster and holds its shape longer.
- Slice bananas last, right before layering, to minimize browning.
- Make sure each banana layer is fully covered by pudding, not just partially — this is the main thing that helps slow browning and keep bananas looking fresh longer.
- For individual portions, layer the same ingredients into small cups or mason jars instead of one large dish.
- Common Mistakes to Avoid:
- Using cook-and-serve pudding instead of instant — it won't thicken without being heated on the stove.
- Overbeating the whipped cream past stiff peaks, which makes it grainy and hard to fold in smoothly.
- Not chilling long enough — under 4 hours, the wafers stay too firm and the layers won't hold together when scooped.