
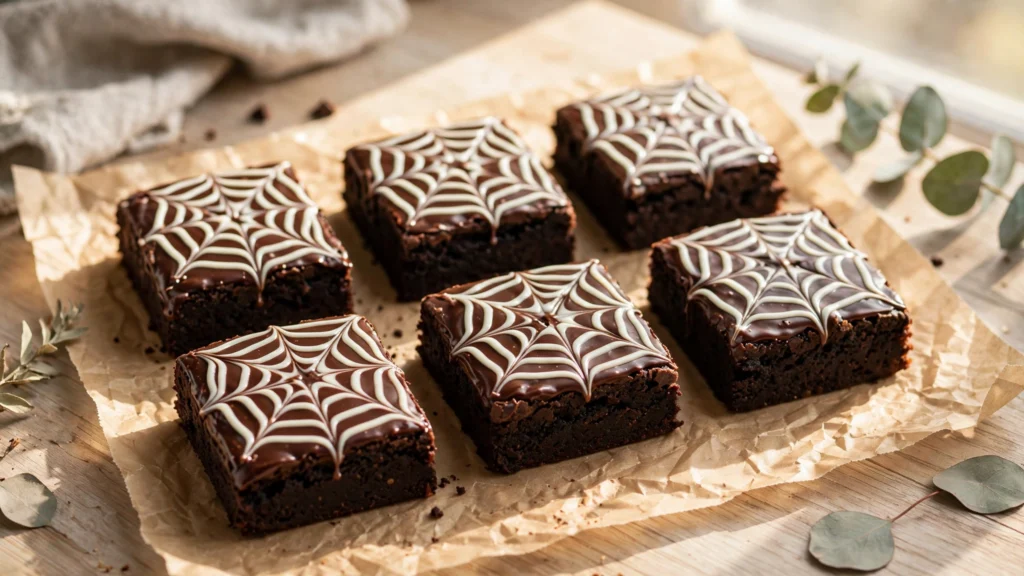
Spiderweb Brownies are dense, fudgy cocoa brownies finished with a layer of glossy semisweet chocolate ganache and a decorative white chocolate spiderweb piped on top and dragged into shape with a toothpick. The brownie base is made with cocoa powder rather than melted chocolate, which keeps the batter simple to mix by hand in two bowls with no double boiler required. The result is a brownie that’s soft and slightly underset in the center when warm, then firms up into a dense, fudgy texture once fully cooled and chilled — deep chocolate flavor balanced by the smooth, slightly sweeter ganache and a light hit of white chocolate on top.
This is a one-pan bake with a straightforward mix-and-bake method, though the decoration step requires a bit of speed rather than patience: the ganache needs to stay warm, glossy, and fluid, and the white chocolate web is piped and dragged into shape immediately, before it has a chance to set. Equipment needed includes an 8×8-inch (20×20 cm) baking pan, an instant-read thermometer for checking the brownies’ internal temperature, a piping bag fitted with a small round tip (or a zip-top bag with the corner snipped), and a few toothpicks for dragging the web pattern. The brownies can be made ahead: bake and cool them up to 2 days in advance, then decorate closer to serving, or decorate fully and refrigerate up to 5 days ahead. Because the visual is built entirely from chocolate and cocoa with no food coloring, this recipe suits anyone who wants a striking Halloween or fall dessert without artificial dyes. The brownies are cut most cleanly after chilling, which also intensifies the fudgy texture for a gooier bite, let cut brownies sit at room temperature for 15–20 minutes before serving.

Spiderweb Brownies
Description
I always thought spiderweb desserts required serious cake-decorating skills, until I realized the whole trick is just a toothpick and a bit of speed. Drag it through warm ganache and white chocolate before either sets, and the web draws itself. What's underneath is the real payoff: a dense, fudgy cocoa brownie that turns almost truffle-like once chilled. No food coloring anywhere just chocolate, doing exactly what chocolate does best.
Ingredients
Instructions
Part A — Brownie Base
-
Preheat the oven to 175°C (350°F). Line an 8×8-inch (20×20 cm) pan with parchment paper, leaving an overhang on two sides for easy lifting.
-
In a medium bowl, whisk together the flour, cocoa powder, salt, and baking powder. Set aside.
-
In a large bowl, whisk the melted butter and sugar together until combined. Add the eggs one at a time, whisking well after each addition, then whisk in the vanilla extract.
-
Add the dry mixture to the wet mixture and fold with a spatula just until no streaks of flour remain. Do not overmix, or the brownies will bake up cakey rather than fudgy.
-
Pour the batter into the pan and smooth the top. Bake for 16–18 minutes.
Check for safety: Because this batter has eggs in it, the center needs to reach 160°F (71°C) to be safe to eat. Stick an instant-read thermometer into the thickest part of the center (not touching the pan), and check a spot or two nearby as well — use the lowest number you get.
Check for texture: A toothpick poked between the center and the edge should come out with a few moist crumbs stuck to it. That's what you want. It shouldn't come out totally clean, but it also shouldn't have any wet, raw batter on it.
If the temperature is under 160°F, or you still see raw batter, bake for 2 more minutes and check again. The top may look slightly underdone when you pull it out — that's normal, and it'll finish setting as it cools.
-
Let the brownies cool in the pan at room temperature for about 60 minutes, then refrigerate for 30 minutes before decorating. Chilling makes them easier to top and cut cleanly.
Part B — Decoration
-
Before making the ganache, melt the white chocolate chips in 20-second bursts in the microwave at 50% power, stirring between each burst, until smooth. Transfer to a piping bag fitted with a small round tip (or a zip-top bag with one corner snipped very small) and set aside — you'll need it ready to use right away.
-
Place the semisweet chocolate chips in a heatproof bowl. Heat the heavy cream in a small saucepan over medium heat until steaming, with small bubbles at the edge but not boiling. Pour it over the chocolate, let sit undisturbed for 5 minutes, then stir until smooth and glossy — this is the ganache.
-
Lift the brownie slab from the pan using the parchment overhang and pour the warm ganache over the top, spreading it evenly with an offset spatula. Work quickly from here — the web only forms cleanly while the ganache is still glossy and fluid, not once it starts to set.
-
Cut the brownie slab into 16 squares. On each square, immediately pipe the white chocolate in a continuous spiral starting from the center and working out to the edge.
-
Right after piping, drag a toothpick from the center of the spiral out to the edge in 6–8 straight lines, wiping the toothpick clean between each brownie, to blend the white chocolate and ganache into a spiderweb pattern. Visual cue: the line should pull smoothly into a soft curve — if it just scratches the surface without blending, the ganache has started to set; work on the next brownie faster.
-
Once all brownies are decorated, refrigerate for at least 20 minutes to fully set the ganache and webs before serving.
Nutrition Facts
Servings 16
- Amount Per Serving
- Calories 351kcal
- % Daily Value *
- Total Fat 20.4g32%
- Saturated Fat 11.6g58%
- Cholesterol 88mg30%
- Sodium 79mg4%
- Potassium 141mg5%
- Total Carbohydrate 42.4g15%
- Dietary Fiber 2.3g10%
- Sugars 33.4g
- Protein 4.1g9%
* Percent Daily Values are based on a 2,000 calorie diet. Your daily value may be higher or lower depending on your calorie needs.
Note
- Storage: Store covered in the refrigerator for up to 5 days. The texture is fudgiest cold; let sit at room temperature 15–20 minutes before serving if you prefer a softer bite.
- Freezing: Freeze undecorated brownies, well wrapped, for up to 3 months; thaw in the fridge before adding ganache and webs. Fully decorated brownies can also be frozen in a single layer, then stacked with parchment between layers, for up to 1 month.
- Reheating: These are meant to be served chilled or at room temperature — reheating isn't recommended, as it will melt the white chocolate webs.
- Pro Tips:
- Work with cooled, chilled brownies before decorating — a warm base will make the ganache slide instead of set.
- Pipe and drag one brownie at a time; the ganache firms up fast, and webs are cleanest when piped just before dragging.
- Wipe the toothpick between each brownie so lines stay crisp instead of smudged.
- If the white chocolate seizes or gets too thick to pipe, stir in ½ teaspoon of neutral oil to loosen it.
- Common Mistakes: Overbaking is the most common issue — pull the pan while the center still looks slightly underdone. Overmixing the batter is the second most common issue and leads to a tougher, less fudgy brownie.